
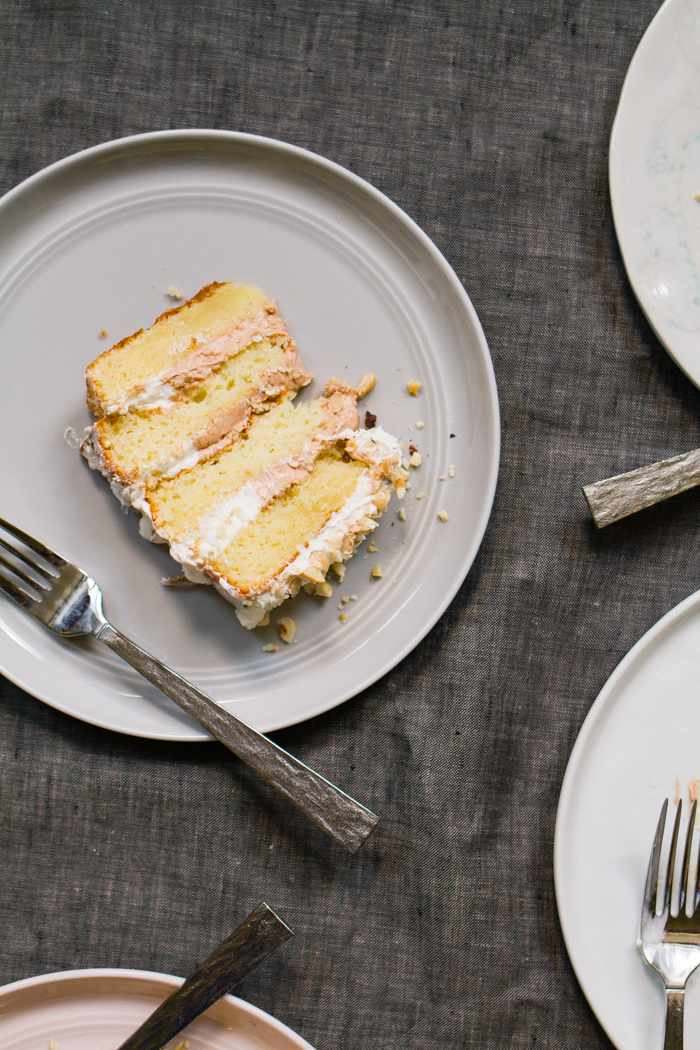
Mini Golden Cake with Chocolate Filling and a Hazelnut Buttercream

Robert and I recently celebrated our two year wedding anniversary, which feels totally bonkers. We honestly still feel like little kids pretending to be adults most of the time. (Does this feeling ever go away?) Our summer was pretty jam-packed with random trips and wedding stuff for friends, so we didn't do anything too crazy to celebrate. A simple dinner out at our favorite local restaurant was all we needed - we put the phones away, caught up with each other, reminisced, and got a little bit tipsy. We were supposed to hang out with friends afterwards but that didn't happen, and we were secretly (or not so secretly) excited to just go to bed early on a Friday night (because we're actually sixty years old).

But leading up to our anniversary, we did have this cake a few times as I was testing it. It's a mini version of our wedding cake (you can find the full recipe here), and it's one of our favorite cakes we've ever had. It's one of the only desserts that Robert can't stay away from (he has way more will power than me in that department), which is how you know it's really good. Other examples that fall into the Robert-Can't-Get-Enough category: these pumpkin ginger cookies and My Ultimate Chocolate Chip Cookie Recipe.

Since making a full cake for us is way more than we need, I wanted to figure out a smaller version of it that I could theoretically make for us every year to celebrate. A small cake for two seems like the perfect way to celebrate an anniversary. (Even though this cake is miniature, it's still very generous for two people. Feel free to invite some close friends over to help you finish it, or just savor it every night for a few days after making it.) And since I'm a total math nerd, I had a lot of fun doing the math to scale this down into a 6-inch cake. Now I understand Christina's thrill for scaling down desserts for two.

I chose to make this mini version of the cake a "naked cake," and it was my first time trying out this technique. In case you're not familiar with them, naked cakes have frosting on the top but then the sides have more of a "crumb coat," rather than a full coating of frosting. I often feel like layer cakes have too much frosting (it tends to overwhelm the actual cake, which is my favorite part), so this seems like a better balance. Since this mini cake has 4 mini layers, you have plenty of frosting in between each of those and you don't miss the frosting on the sides at all. It's perfect! I can't wait to play around with more naked cakes from here on out.

Another way we celebrated this year was by finally ordering hardbound books with our wedding and honeymoon photos, something we had been talking about doing since before the wedding even happened. Artifact Uprising was our obvious choice, as I had already been using them to order other keepsake photo books throughout our relationship. On the first anniversary of our first date (our date-iversary, as we still like to refer to it), I had put together photos from both of our Instagram accounts into one of the Instagram-friendly books by Artifact Uprising. I then continued that tradition for our second and third date-iversaries. I always choose photos that we took when we were together, so it gives us a nice little overview of each year of dating with photos of trips we've taken, meals we've made together, or just lazy weekends at home with the dog. I actually totally forgot to make one this year for our fourth date-iversary .... woopsies. Maybe these wedding and honeymoon books will make up for it.
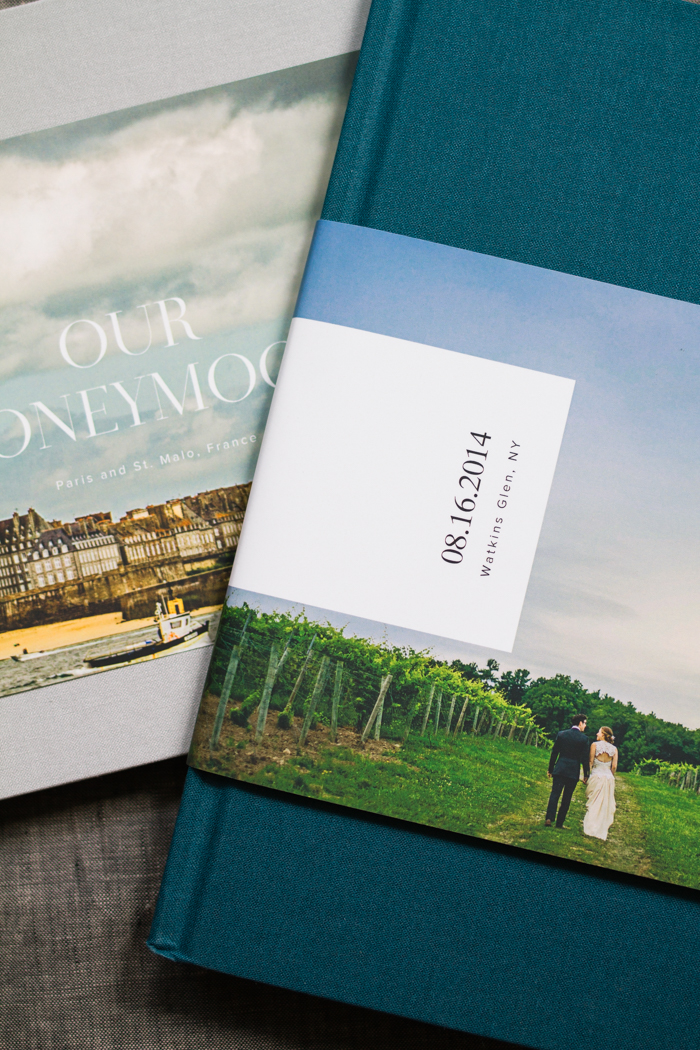
As we were putting together these books, it became a nice way to look back on those special days of our wedding and honeymoon. We kept looking at the photos of our ceremony location or our view from the top of the Eiffel Tower or the landscape of St. Malo and saying to each other, "Our honeymoon was fake. That's not real. Were we really there?" Digital photos are one thing, but it's another thing altogether to have this physical keepsake with all of the photos in one place, so you can snuggle together on the couch and hunch over it with a smile on your face.

The actual books arrived and they are even more beautiful than we had hoped for. I'm a huge fan of books (have you noticed?) - I took bookmaking and book design classes in college, I interned for Penguin books, I get excited about endpapers and pull dust jackets off to look at the fabric covers and spines underneath them. Books are kind of my thing. These ones are gorgeous - the dust jacket paper is thick and velvety, the interior paper is also luxurious, and the photos printed with a lovely vintage film quality to them. (I'm not surprised, since Artifact Uprising is a VSCO company.)

In the age of digital photos being everywhere you turn, I'd urge you to get your own wedding photos or pictures from a special trip printed in one of these books. I have visions of our great-grandchildren one day finding these covered in dust in an attic somewhere ... perhaps in our summer home on the Mediterranean that we've passed onto our children. (Okay, now I'm just dreaming.) On a smaller scale, Artifact Uprising also offers sets of small square prints (I have some of those too), which would be fun for making a little gallery wall. They also do larger framed prints, cards and calendars, etc.


GIVEAWAY
[UPDATE: This giveaway has closed.] Today's your lucky day because in teaming up with me for this post, Artifact Uprising is offering a set of their wood block and prints to one lucky reader. Just use the rafflecopter below to enter. This giveaway will close on Sunday, October 9th at 11:59PM EST.

The 6-inch gray cake stand featured in this post is from Food52, and the forks pictured are from For the Chef.
Illustration at top created with pencil and Photoshop.
Prints of my illustrations (along with other products with my work on them) are available in my Society6 shop.

Mini Golden Cake with Chocolate Filling and a Hazelnut Buttercream
A cute 4-layer, 6-inch version of my wedding cake!
INGREDIENTS
For the cake:
1/2 cup + 2 tbsp (82g) all purpose flour
1/2 cup + 2 tbsp (82g) cake flour
2 tsp baking powder
1/4 tsp fine sea salt
3 egg whites, room temperature
1/3 cup granulated sugar
12 tbsp (1.5 sticks) unsalted butter, room temperature
3/4 cup granulated sugar
3 egg yolks, room temperature
3/4 cup whole milk
1 tsp vanilla extract
For garnish:
1/4 cup raw hazelnuts
For the chocolate and hazelnut buttercreams:
3 egg whites, room temperature
2 tbsp granulated sugar
1/2 cup granulated sugar
5 oz water
2.5 sticks COLD, unsalted butter
1.5-2 tsp hazelnut extract
0.85oz (25g) semisweet chocolate, melted
INSTRUCTIONS
Make the cake:
Preheat oven to 350°F and prepare two 6-inch cake pans with butter, flour (and parchment paper rounds, if desired).
Sift the flours, baking powder and salt together in a medium bowl.
Using the whisk attachment of your stand mixer, beat the egg whites to soft peaks. Slowly add the 1/3 cup sugar while continuing to whisk until medium glossy peaks are achieved. Move the egg whites to a separate bowl so you can use the mixing bowl for the rest of the batter. (No need to clean it at this point.)
Beat together the butter and 3/4 cup sugar in your stand mixer bowl with the paddle attachment until light and fluffy. This should take a few minutes.
Add the egg yolks one at a time while continuing to cream the butter mixture. Mix one additional minute after they have all been added.
Add in the vanilla extract, and then alternately add the milk and flour mixture, mixing just until combined. (I did 3 installments of the flour mixture and 2 installments of the milk.) Do not overmix.
Starting with ¼ of the egg white mixture, gently fold that into the rest of the batter. Fold in the remaining egg whites ¼ at a time. Try to keep as much air in the egg whites as possible.
Spoon the batter into the prepared pans equally. Bake for about 25-30 minutes or until golden on top and a toothpick inserted in the center comes out clean.
Let them cool for 10 minutes in the pan before inverting them onto a wire rack to cool completely. Wrap each 6-inch layer in plastic and chill in the fridge for at least two hours or overnight. You can also freeze it, which could make cutting it easier later on.
Roast the hazelnuts:
Preheat the oven to 275°F.
Place the hazelnuts on a sheet pan and roast for 10-15 minutes, stirring every 5 minutes, until they have developed a deeper brown color and are fragrant.
Let them cool slightly. Then place them in a kitchen towel and rub furiously until most of the skins have come off.
Roughly chop and set aside.
Make the buttercreams:
Beat egg whites with a whisk until soft peaks form. Slowly add the 2 tbsp of sugar while continuing to whisk until firm, glossy peaks form.
Combine the 1/2 cup of sugar and 5 oz of water in a small saucepan over high heat, stirring until the sugar is dissolved. Then stop stirring and DO NOT stir again. Let the sugar and water boil until the temperature on a candy thermometer reaches 248°F. It will hang out around 210°F for a while, but just give it time and it will start to go up again. This should take about 10-15 minutes.
Remove the sugar syrup at exactly 248°F and pour into the egg white mixture while whisking quickly, being careful not to pour the syrup on the whisk or bowl edge.
Add butter to the egg white and sugar syrup mixture at a medium pace, one tablespoon at a time. If the mixture appears to curdle, whisk quickly until it comes back together. The idea here is to bring the temperature of the egg and syrup mixture down with the addition of cold butter, but not too quickly or too slowly.
Remove 1/3 of the mixture and set aside in a separate bowl.
Add the hazelnut extract to the remaining 2/3 while continuing to whisk. Feel free to use more or less extract to get the taste you prefer.
Continue to whip the frosting for a few more minutes, or until very glossy and light with no air pockets.
Remove the hazelnut buttercream and set aside in a separate bowl.
Add the reserved frosting back to the mixing bowl and add the melted chocolate. Continue to whip the frosting for a few more minutes, or until very glossy and light with no air pockets.
Assemble the cake:
Using a long, serrated knife, cut each 6-inch cake in half. If they have a large dome on top, trim that off as well.
Place one of the four layers on your cake plate with the flattest side on the bottom. Place pieces of parchment around the cake with part of it going under the cake to keep your plate clean.
Fill a piping bag with the hazelnut buttercream and fit it with a medium round tip. Pipe a ring of the frosting around the edge of the cake to create a "frosting dam." Inside the frosting dam, top the rest of that layer with the chocolate buttercream.
Place another cake layer on top and repeat the same frosting technique. Repeat again with your third layer, and make sure to leave one cake layer with a very flat side for the top (one of the bottom pieces) so you can have a nice flat top for your cake. Give the very top a smooth, generous layer of the hazelnut buttercream.
Smear the frosting around the edges of the cake where it's spilling out between each layer. Use your extra hazelnut buttercream to smear some more on the sides as much as you want, giving it a very rustic look.
Scatter your chopped roasted hazelnuts on top.
Enjoy! Store at room temperature in a cake stand or cake saver.
NOTES
Adapted from this recipe, courtesy of Jessica Thorpe from Glen Mountain Market